Make Payments
Make payments in several ways
Explore MX Merchant payment tools—including Quick Pay, Invoices, Recurring Payments, and Payment Links—to accept customer payments securely, flexibly, and efficiently.
Overview
MX Merchant provides multiple payment tools designed to support different business scenarios, from quick, one-time transactions to structured billing agreements. Whether you need to process payments on the fly, send invoices, automate recurring charges, or collect payments online through links, each tool is built to be fast, secure, and easy to manage. Use the guides referenced below to choose the option that best fits your workflow and customer needs.
Payment Tools
MX Merchant offers several options for getting payments from customers. You can have a general idea of each one below. If you need to learn more about any of them, be sure to consult the user guides and portal guides referenced below.
Quick Pay
For quick, unplanned transactions on the go, Quick Pay will be the most convenient tool. To make a payment this way:
-
Click the green Quick Pay button on the upper left-hand corner.
-
You will be prompted to enter the following payment information You can learn the specifics of each one in the Quick Pay portal guide:
- Transaction Type - Sale or Refund.
- Tender - Cash, Card or Check.
- Amount - Example: $9.14
- For Cash transactions:
- Presence Type - Card Not Present, Card Present Keyed, Card Present Swiped or Terminal.
- Card Number - Example: 4417 6753 9413 3174
- Valid Thru - Example: 01/31
- Postal Code - Example: 25998
- Security Code - Example: 469
- Street # - Example: If the billing address is 68 Ventura Blvd, just enter 68.
- For Check transactions:
- Check Name - Examples: Joseph Gates or MCT Development.
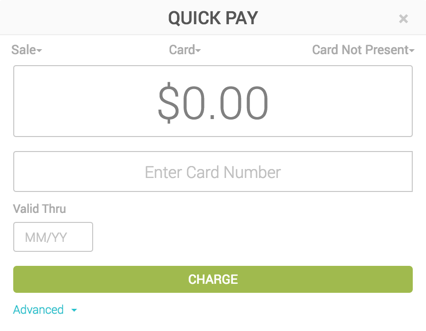
- Charge.
Notes:
Quick Pay offers two sections for additional information: Advanced and Level 3 Data
Invoices
In B2B transactions or transactions requiring documentation, you can also make payments through invoices. You may create new invoices or use existing ones.
To create an invoice:
-
In the Invoices section, click + Add Invoice, on the upper right-hand corner.
-
Enter the following information:
- Customer - Name, type, status, tax ID, customer number, profile and tax-exempt status of the customer.
- Billing - Invoice date, due date, PO number and payment method.
- Items - Products, quantities, prices, taxes and discounts.
- Attachments - Optional attached documents.
-
If you need to make a payment for the invoice immediately, click Add Payement. You will then be prompted to make the payment as if using Quick Pay. Otherwise, you can click either Save or Save & Send.
To use an existing invoice:
-
Click + Add Payment.
-
You will be prompted to process the payment. Fill in the required information as if you were using Quick Pay.
Note:
To learn more the fields needed for invoice creation and payment, please consult the Create Invoices user guide and/or the Invoices portal guide.
Recurring Payments
For payment agreements with several installments, a recurring contract is the way to go. In order to create a new recurring contract:
-
In the Recurring section, click + Add Contract, on the upper right-hand corner.
-
Enter the following information:
- Contract - Create or select a recurring contract. All auto-completed fields can be edited if necessary.
- Customer - Create or select the customer who will receive the recurring contract
- Items - If an existing contract is selected, this section will populate automatically. You may still add, remove or modify product feature.
- Schedule - Select the start date, frequency, charge date. Then, request the customer's agreement and indicate whether the first installment will be charged immediately.
- Payment - Select the following features as needed:
- Whether the customer will be billed automatically when the contract goes into effect.
- Whether the invoice will be sent to the customer without billing them.
- When the payment is expected to take place.
- Whether credit cards will be accepted
- Whether the first invoice will be adjusted depending on the actual time that the customer uses the service before the second invoice
- Attachments - Upload any additional files as needed.
-
Save & Start.
Note:
- To learn more the fields needed for recurring contracts, please consult the Generate Recurring Contracts user guide and/or the Recurring portal guide.
Payment Links
For a streamlined method for making online payments, payment links offer a fast solution. To create a payment link:
-
In the Payment Links tab, Click +Add Payment Link.
-
You will then be directed to the General Info tab of your new payment link.
-
Fill in the following information:
- Active - When enabled, customers can submit payments; when inactive, no payments will be accepted.
- Name: The unique name you want to assign to the payment link.
- Description - Text displayed at the top of the payment link, visible to your customers.
- If payment is successful, go to URL: The page customers are redirected to after a successful payment.
- If payment fails, go to URL - The page customers are redirected to if their payment attempt is unsuccessful.
- Amount Limit - Specify either a fixed amount or an acceptable range. The default setting is “No limit”.
- Expiration Date - Date after which the payment link will automatically deactivate and no longer accept payments.
- Prompt for Invoice Number - Allows you to request an invoice number from the customer before completing the payment.
-
Save.
After the customer receives the payment link, they will be able to enter their card information, amount of the transaction, their billing information, confirm they are not a robot, and Submit.
Your customer will then be redirected to a site If you entered Success and Failure URLs for your link. If you did not set up any, they will receive a success or decline message at the bottom of the form.
Once a payment is made on this form it will immediately be visible to you within MX Merchant.
Note:
- Payment links offer a great number of customization options and settings. To learn more about them, please consult the Payment Links portal guide.
Updated 20 days ago